Hair Foils: A Comprehensive Guide For Stunning Highlights - AMR Hair & Beauty

Hair Foils: A Comprehensive Guide For Stunning Highlights

Oct 06, 2023Sharnee Rawson

Everyone is always raving about hair colour foils. After all, they’re one of the most popular choices for colouring hair. Their popularity also means it can be intimidating to ask questions, and many people feel lost when the topic of newly treated locks arises.

Fortunately for you, we’ve compiled a detailed overview of the wondrous world of hair colour foils. There’s information for beginners, such as what are hair colour foils, how long should they take and what about the before-and-afters? There is also information for experts: what effects can they achieve, and what brand is best?

Keep reading to discover new information or refresh your knowledge!


The Ultimate Guide To Hair Colour Foils

Hair colour foils, also called hairdressing or salon foils, are thin sheets of foil used during hair colouring. They can be cut yourself or purchased in pre-cut strips. The standard colour is silver, but using distinct colours or prints can prevent confusion once products have been applied—and they look more exciting! 


How Do Hair Colour Foils Work?

Hair foils work by allowing strands of hair to be carefully separated. Products can be applied without accidentally affecting unwanted areas, and foil is wrapped around the hair to generate heat and complete the process. The most common hair colouring product applied during this service is bleach. This may sound harsh, but the effects are worthwhile.

Often, it is advised that foils shouldn’t be used on short hair. This is because an inexperienced or inattentive hand can cause a patchy and unappealing appearance. However, there are plenty of guides about using foils on shorter haircuts to achieve a gorgeous outcome. It’s all about patience and experience.


Full Head Of Foils vs. Partial Highlights: What’s The Difference?

When you want to make a radical change, it is most likely that you will do a full head. In contrast, if you are scheduled to take care of a regrowth, your stylist will partially cover your head in foils. 

This process usually involves:

  • Placing foils on the front part of your scalp to accentuate the most visible of your head with highlights. (You can save up to half an hour.) 
  • Doing up to 12 foils to rework the same highlights you got the first time but without causing unnecessary damage to your hair. (Deduct 30 to 40 minutes from the 2-hour session.) 
  • Sectioning the hair to do a 1/4 head of foils or even 3/4 head of foils if that fits the outcome you want to achieve. (Length varies depending on length and hair quality.)


How Long Do Hairdressing Foils Take?

The time required for hair colour foils will vary depending on a range of factors, including: 

  • Type of colouring (full or partial).
  • Length of the hair.
  • Experience level of the salon.

However, the average time is approximately two to three hours.

Keep in mind that touch-ups will need to be performed approximately every six weeks to prevent visible regrowth.


How Many Foils Do I Need?

This is a question that many people forget to factor in. How many foils does it take to achieve a polished look?

The answer again depends on the length of the hair and the type of colouring (full or partial). However, for a full head of hair, it’s standard to use 50 to 100 foils.


Considering A Full Head of Foils? Before & After For Blonde, Red & Brown Transformations

If you're curious about how a plain-looking hairstyle transforms into a catwalk-worthy mane, keep reading. It’s natural to be inquisitive about the effect of full foils on dark hair versus highlights on virgin blond hair. Make sure you check these incredible before-and-afters. We hope to make your decision slightly easier.

1. Dimensional root shadowing  

We love a full head of highlights so much because the technique is unmatched for achieving natural and subtle colour dimensionality. 

But did you know that you can make the transitions in your hair look even more seamless? Yes, welcome to the world of root shadowing. Root shadowing (also called root smudging) is a technique where the roots are coloured with a darker colour than the rest of the hair. Root shadowing mimics a natural regrowth that’s moderately darker than the hair that has been extensively exposed to sunlight or previous products:


2. Sun-kissed babylights

Has this blonde spent her last three hours in a hairdresser’s chair or strolling on the beach? That is an excellent question considering how beautifully interwoven are the golden and the dark highlights on this hair. The advantage of doing a full head of blonde foils on brown hair is that you get that beach babe look but without the excessive exposure to UV rays:  


3. Full dark-to-blonde transformation

The easy and healthy way to highlight your hair for more than 5 to 6 shades is by getting your head fully covered in foils. This way, your darker hair that hasn’t been bleached or exposed to a stronger developer will provide the much-needed shiny structure. 


4. Balayage ombre

Not all hairdressers use a full head of foils to achieve the balayage look. However, it is a failproof method for smooth hair blending on large sections as well as applying more than one highlight colour on the basic colour. Precision in colour tweaking is what draws most clients into getting foil highlights. With balayage, you get extra dimensionality to replicate the most natural differences in hair colour.


5. Red to rosegold transition

Redheads can have it hard when going blonde. Very light blondes retain leftovers from hair that has previously been dyed red. This can make the hair look brassy. Your hairdresser can work with what is available by bleaching a full head of blonde foils and mixing rosegold toners or colours to blend in and achieve a cool red tone that transitions into platinum highlights.  


6. No more orange

If you’ve spent a lot of time at home and had a few unsuccessful attempts to lighten your hair, the final result may look something like the ‘before’ photo in this Instagram post. You hairdresser will apply foils, no-yellow toner and no-orange shampoo afterwards to solve this problem. However, don’t do too many of these experiments at home. 


7. Caramel copper painted balayage 

We usually consider foils the hairstyle for blondes and brunettes. But once you witness the wonders of foils distributed on top of a rich basic red colour, you’ll start thinking differently. The vibrancy in these red locks is achieved with this painted balayage technique completed by mixing copper and caramel highlights. 


8. Pastel blue-grey blonde

This is not a regular grey. It is rather a more radical grey hairstyle achieved by applying a full head of blue and grey highlights on dark brown hair. Drastic hair lightening makeovers such as this one require a gentle approach. This is achieved by partially highlighting the basic colour with nuances that differ in up to seven tones.  


9. Head Of Foils For Blonde Regrowth Correction

As much as we would all want that to be true, hair that has been subject to multiple colouring treatments in a short period is just not in the same shape as minimally processed hair. Therefore, hairdressers would often recommend using a full head of foils instead of covering your scalp in colour. The benefit of this subtle approach is that you get brilliant, even-looking highlights that melt with the lowlights, giving the impression you have extra volume and dimensionality. And you still get to keep the hair healthy long term!   


10. Chocolate brown highlights

The before and after effects of a full head of foils are stunning when you consider how much they can shift the perception of your hair quality. From flat and dull tresses, you will progress to a bountiful, shiny hairstyle that enlivens your whole face. This is especially apparent when you leave at least three tones between the darker and the lighter colour. For example, as in these chocolate foil highlights.  


Why You Need AMR Professional Patterned Hair Foils

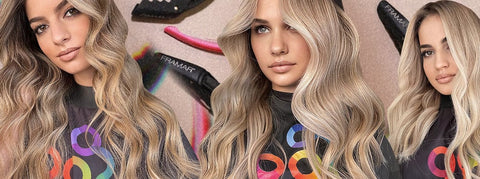
Most traditional foils are the same: crinkly, silver sheets. They work well, but they look boring. The silver colour recalls food wrap and hats worn by conspiracy theorists.

Well, what if there was a different option? 

Colourful and patterned hair foils are becoming increasingly popular amongst salons. They set your businesses apart, and they're so Instagrammable! Think of the pictures you can use to advertise your services.

In addition, the foils are great for organising. Are you juggling multiple treatments for a client? Use foils to distinguish between the treatment types. Are you managing numerous clients at once? Use coloured and patterned hair foils to aid your memory.

Foils are certainly more than just looks!

Characteristics Of AMR Professional Hair Foils

Trying a new product is always intimidating, but let's alleviate your concern by studying the details. AMR Professional Foils are certainly worth a closer look.

  • Pre-cut Sheets and Rolls: AMR Professional foils are available in pre-cut sheets and rolls. They're the best of both worlds.
  • Heat: Foils from AMR Professional trap and reserve heat effectively. It's an important task because warmth guarantees better results for bleaches and dyes.
  • Separation: AMR Professional foils will help to separate the hair and provide a canvas for applying product. 
  • Texture: Some AMR Professional Foils have a gritty texture, which provides a better grip during foiling. Others are smooth for a traditional feel.
  • Colour and Pattern: The unique patterns offered by AMR Professional mean no confusion when performing multiple treatments at once. They're also highly aesthetic. You can snap many incredible photographs with these picture-ready products.

How To Use AMR Professional Foils

AMR Professional Foils are applied just like traditional foils. Let's launch into a quick refresher, and see if you can spot differences in the instructions below.

  • First, ensure the correct amount of moisture in the hair. Colouring is best done when hair is dry, but bleaching can be performed on wet hair.
  • If using rolls, cut the foil into strips depending on hair length. The most common size is 10-13cm wide and 20-30cm long. If using pre-cut options, simply peel from the packaging.
  • Select the parts of the hair you need to transform.
  • Place sheets of foil underneath the section of hair.
  • Apply the product using your desired method.
  • After the hair treatment is applied, wrap the foil around these sections.
  • Leave to set. Times will vary depending on the treatment, so always read the instructions carefully.
  • Remove the foil and wash the hair.

See - nothing out of the ordinary during the process! Simply apply AMR Professional Foils like other brands, and you gain the added fun of colours and patterns.

More articles

Comments (0)

There are no comments for this article. Be the first one to leave a message!

Leave a comment

Please note: comments must be approved before they are published